In a world where digital convenience is paramount, Windows 7 Remote Assistance emerges as a cornerstone of collaborative problem-solving. Picture a virtual, tech-savvy ally, available at any time to guide you through the complex landscape of computer glitches.
Well, the Remote Assistance tool not only brings expert help to your fingertips but also eliminates the barriers of distance and time. This guide is your passport to embracing this powerful tool, ushering in a new era of seamless, secure, and proficient computing experiences.
What is Windows 7 Remote Assistance?

Windows 7 Remote Assistance is a valuable tool. It allows someone with more expertise to assist by taking control of your PC remotely. The process of using Remote Assistance involves two parties: the novice who needs help and the expert who assists. The key feature of Remote Assistance is that both parties can view and control the same computer to resolve the issue at hand.
Setting Up Windows 7 Remote Assistance
Before setting up Windows 7 Remote Assistance, ensure that your computer and the computer you want to assist are on the same LAN or connected through a VPN. It’s also important to check the firewall settings on both machines to allow Remote Assistance traffic. To enable Windows 7 Remote Assistance on your computer,
- Go to System Properties > Remote tab, and select “Allow Remote Assistance.”
- Ensure to enable this option on the machine assisting and the one receiving it.
- Once you have enabled Remote Assistance, you may need to configure your NAT router for port forwarding or use an IPv6 address to establish a remote connection.
Other Ways For Setting Up Windows 7 Remote Assistance
- P2P Connection
If your network supports P2P connections, this can simplify the process by reducing the need for manual IP address or port forwarding configurations.
- Group Policy
In some cases, you might have to manage Remote Assistance through Group Policy, especially in corporate environments. You can apply settings to control the use of Remote Assistance at the domain, site, or organizational unit level. This enables you to restrict access to specific users or computers.
How to Use Windows 7 Remote Assistance?
To get started, both you and your helper need to allow remote connections on your computers. This can be done by visiting the Remote pane of the System Properties and selecting the ‘Allow Remote Assistance’ checkbox. After allowing remote connections:
- Launch the program by typing “assistance” into your Start menu search bar.
- And click on the resulting program link.
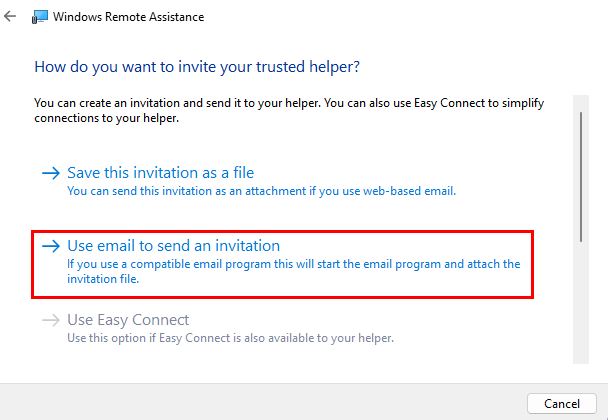
- As the user seeking help, you can choose to invite your helper by either sending them an invitation or using Easy Connect.
To invite someone you trust to help you:

- Select the “Invite someone you trust to help you” option.
- This will generate an invitation file, which you can send to your helper.
- The helper must then open the received invitation file and enter the provided password.
- This establishes a remote connection to your computer.
Alternatively, you can use Easy Connect to establish a remote connection. To do this,
- Simply click on ‘Use Easy Connect’ within the Windows Remote Assistance program.
- Follow the prompts to generate a one-time password.
- Your helper then enters the software on their computer and inputs the provided password.
- Once connected, both you and your helper can see and control your desktop.
What To Keep In Mind For Seamless Remote Sessions?

- It is essential to only use Remote Assistance with someone you trust.
- Always remember to generate a robust and unique password to protect your connection.
- It’s essential to check your router settings, as some routers may block incoming connections.
- If necessary, adjust your router’s settings to allow the required port.
- Remember that you always have the option to deny or revoke their control at any time.
- Lastly, you should verify your policy settings to ensure Remote Assistance is allowed on your computer.
How To Make Remate Session Secured?
When using Windows 7 Remote Assistance, it is crucial to consider security measures to protect your system from threats like malware infections. To enable secure remote assistance:
- Allow remote assistance connections within your system settings.
- In the search box on the taskbar, type remote assistance, and
- Select Allow Remote Assistance invitations to be sent from this computer.
- On the Remote tab, select the Allow Remote Assistance connections to this computer check box,
- Followed by clicking OK (source).
- Be cautious while downloading any files during the session, scanning them for viruses before opening.
- Additionally, limit your remote assistance sessions to trusted individuals only.
- Ensure that both parties have updated antivirus software installed.
Frequently Asked Questions
Q1. How do I enable Windows 7 Remote Assistance?
To enable Windows 7 Remote Assistance, first search for “assistance” from the Start menu, then run Windows Remote Assistance. After you click Invite someone you trust to help you, you will see Easy Connect along with two e-mail-based options for inviting someone to establish a remote assistance session.
Q2. Can I use Windows 7 Remote Assistance to connect to Windows 10?
Yes, you can use Windows 7 Remote Assistance to connect to a Windows 10 PC. Although the interfaces differ slightly. On the Windows 10 computer, the person who needs help should open Quick Assist by pressing the Windows key + Ctrl + Q. They will provide you with a 6-digit code which you will enter in your Windows 7 Remote Assistance.
Q3. What are the best Remote Assistance software alternatives for Windows 7?
Some popular Remote Assistance software alternatives for Windows 7 include:
- TeamViewer – A widely used remote support and collaboration tool with strong security features, allowing you to access and manage various devices remotely.
- AnyDesk – Provides similar functionalities to TeamViewer with low latency and fast data transmissions, enabling smooth remote desktop connections.
- Chrome Remote Desktop – A free, web-based solution by Google that can be used for remote support via the Chrome browser on virtually any operating system.


