
TeamViewer 10 is a popular remote desktop software that enables individuals and businesses to connect and collaborate with ease. Downloading and installing TeamViewer 10 on your device ensures seamless remote support and access to computers and devices across the globe.
We are here to make things easy for you. In this article, we will tell you how to download and install TeamViewer 10 on your PC. Here we will cover different operating systems for you, so the whole download and install Teamviewer 10 process and become easy and seamless for you. So here we go.
Download and Install TeamViewer 10: An Overview
TeamViewer 10 is a powerful remote access and support tool that allows you to quickly connect to other devices, offer remote assistance, and manage online collaborations. It’s easy to use, secure, and highly compatible with various devices and operating systems.
To get started with TeamViewer 10, you first need to download and install TeamViewer 10 on your PC. For this, you just simply need to visit the official TeamViewer website and download the latest version for your operating system. Once the download process is complete, you can move ahead with the installation process.
Once the download and install TeamViewer 10 process is complete, you can easily connect with other devices for remote access and support. It offers top-notch security features, including end-to-end encryption, two-factor authentication, and secure file transfer capabilities. To learn more about remote access solutions and how TeamViewer compares to its competitors, check out this comparison between AnyDesk and TeamViewer.
When using TeamViewer 10 for remote access or support, remember to follow best practices for keeping your data and connections secure. Always use strong, unique passwords and enable two-factor authentication whenever possible. Moreover, if you want to know more about similar tools, you can read our article.
Downloading TeamViewer 10
TeamViewer 10 is an older version of the popular remote desktop software, which is no longer supported. However, you might still find some specific use cases for this version. In this section, we will briefly guide you on how to download and install TeamViewer 10 on different operating systems, including Windows, macOS, and Linux.
To download TeamViewer 10:
- Visit the TeamViewer Support page, which provides download links for older versions.
- Locate the TeamViewer 10 section and choose your preferred operating system (Windows, macOS, or Linux).
- Click on the respective download link to start the downloading process.
Remember that using TeamViewer 10 may not include the latest features, improvements, and bug fixes. We recommend using the latest version of TeamViewer whenever possible to ensure optimal performance and security.
Installing TeamViewer 10
In this section, we will walk you through the process of installing TeamViewer 10 on Windows, macOS, and Linux operating systems. By following these simple steps, you’ll be able to set up TeamViewer 10 on your device in no time.
To get started, follow these steps based on your operating system:
For Windows:
- Open the downloaded installation file (TeamViewer_Setup.exe).
- When the security warning appears, click “Run” to continue.
- Follow the on-screen instructions to complete the installation process.
For macOS:
- Locate the downloaded file and double-click it to initiate the installation process.
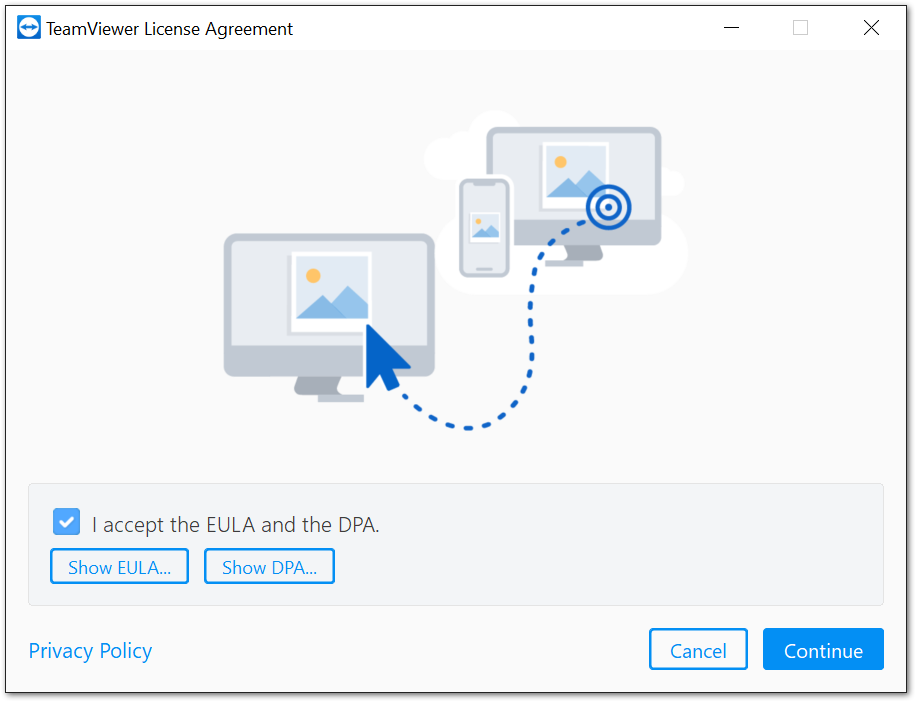
- Follow the on-screen instructions, accept the license agreement, and choose the installation type (full or custom).
- When prompted, create a TeamViewer account or sign in using your existing credentials.
- Complete the installation process and launch the TeamViewer application.
For Linux:
- Find the downloaded file and give it a double-click to start the installation procedure.
- Adhere to the on-screen guidelines, agree to the licensing terms, and decide on the installation mode (complete or customized).
- When asked, either generate a TeamViewer account or log in with your current details.
- Finish the installation steps and open up the TeamViewer application.
Starting with TeamViewer 10
TeamViewer 10 is a powerful remote assistance tool that allows you to connect to remote devices and provide support or access resources on those devices. To get started, follow these simple steps:
- Download TeamViewer 10: Visit the TeamViewer download page and choose the version compatible with your system (32-bit or 64-bit). Make sure to select the “TeamViewer Full Client” for comprehensive support features.
- Install TeamViewer: After the download is completed, launch the installer and follow the on-screen instructions to complete the installation process.
- Create an account: Once TeamViewer is installed, open the application, and sign up for a free account by providing your email address and creating a password.
- Log in: Log in to your TeamViewer account with your email and password. This will allow you to access the full features of TeamViewer 10.
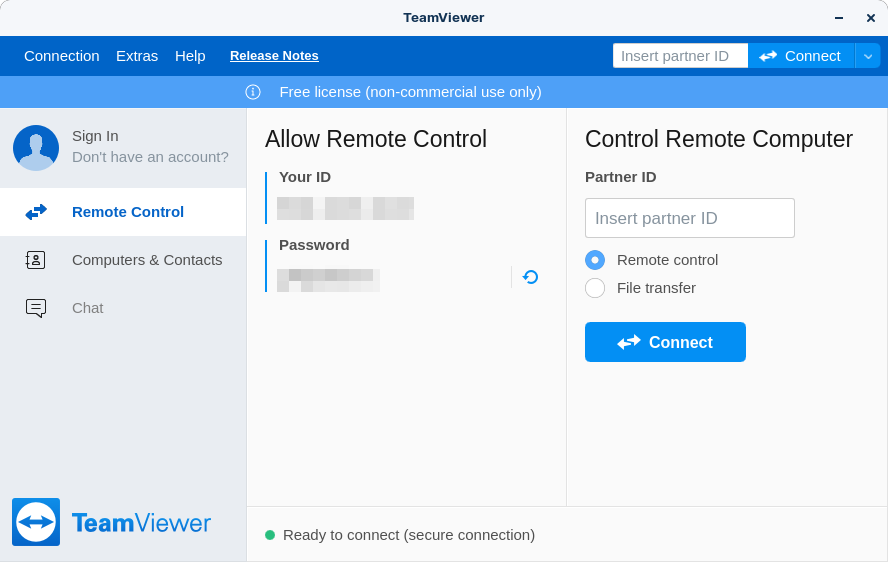
- Explore the interface: TeamViewer 10 has a user-friendly interface that makes it easy to navigate. On the left side of the main window, you can see the options for Remote Control, Meetings, and Computers & Contacts.
- Start a remote session: To begin a remote session, enter the ID of the remote device you want to connect to in the “Partner ID” field. Click “Connect,” and you will be prompted to enter the password for the remote device. Once connected, you can provide assistance or access resources on the target device.
Frequently Asked Questions
Q1. How can I install TeamViewer on Windows?
Here is a step-by-step guide to install TeamViewer on your Windows computer:
- Visit the TeamViewer download page and download the installer for Windows.
- Open the downloaded file and follow the installation wizard’s instructions.
- Choose “Default installation” and click “Accept – Next.”
- Complete the installation process and launch TeamViewer.
Now, you can start using TeamViewer on your Windows computer for remote access and support.
Q2. What is the difference between TeamViewer Classic and QuickSupport?
TeamViewer Classic is the full version of TeamViewer, which allows you to both provide and receive remote support. It offers features like file transfer, remote control, and unattended access.
On the other hand, TeamViewer QuickSupport is a lightweight version designed for customers who only need to receive support. It doesn’t require installation, and it’s perfect for occasional support sessions.
Q3. Is it possible to download TeamViewer 15 for free?
Yes, you can download TeamViewer 15 for free for personal, non-commercial use. Visit the official TeamViewer website to download the latest version.
Remember, if you’re using TeamViewer for professional or commercial purposes, you’ll need to purchase a license.
Q4. Which TeamViewer version is best for my PC?
The best TeamViewer version for your PC depends on your operating system and hardware compatibility. TeamViewer 15 is the latest and most feature-rich version, compatible with Windows, macOS, Linux, and mobile devices.
For older operating systems or hardware, you might need to use an earlier version of TeamViewer. You can find a list of previous TeamViewer versions on the official website.
Make sure to always download the version best suited for your computer’s operating system and hardware to ensure a smooth user experience.

