It can be incredibly useful to remotely access Windows 7. This feature allows you to access your computer from another location, enabling you to retrieve files, access work documents, or assist friends and family with technical issues. With the help of Remote Desktop, you can connect and control your Windows 7 PC with ease.
In this article, we’ll walk you through the process of setting up and using Remote Desktop on a Windows 7 computer. By following these straightforward steps, you’ll be able to quickly and securely access your PC from anywhere that has an internet connection.
Understanding Remote Access
With the advancements in technology, remote access has become an essential tool for both personal and professional users. It allows you to access a computer from a different location and perform various tasks such as file transfer, support, and device management.
One of the prominent remote access tools available in Windows 7 is Remote Desktop Connection. This built-in feature allows you to access another computer’s desktop as if you were sitting in front of it. You can retrieve files, run applications, and even provide technical assistance to others from the comfort of your home or office.
Another option to remotely access Windows 7 is Remote Assistance. Unlike Remote Desktop, which establishes a new user session, Remote Assistance allows you to temporarily take control of another person’s computer and help them solve a technical issue or guide them through a process.
To set up remote access on your Windows 7 computer, you may need to download and run the Microsoft Remote Desktop Assistant, which updates your system settings, ensures your computer is awake for connections and checks that your firewall allows Remote Desktop connections.
As technology evolves, newer versions of Windows, such as Windows 10 Home, offer even more convenient and secure remote access options. But even for Windows 7 users, remote access provides valuable benefits that can help you stay connected, productive, and able to provide support to others, no matter where you are.
How to Remotely Access Windows 7?
To remotely access Windows 7 computer, follow these simple steps to ensure a smooth and secure experience. Keep in mind that your computer must have an internet connection to use Remote Desktop Connection properly.
1. Allow Remote Assistance
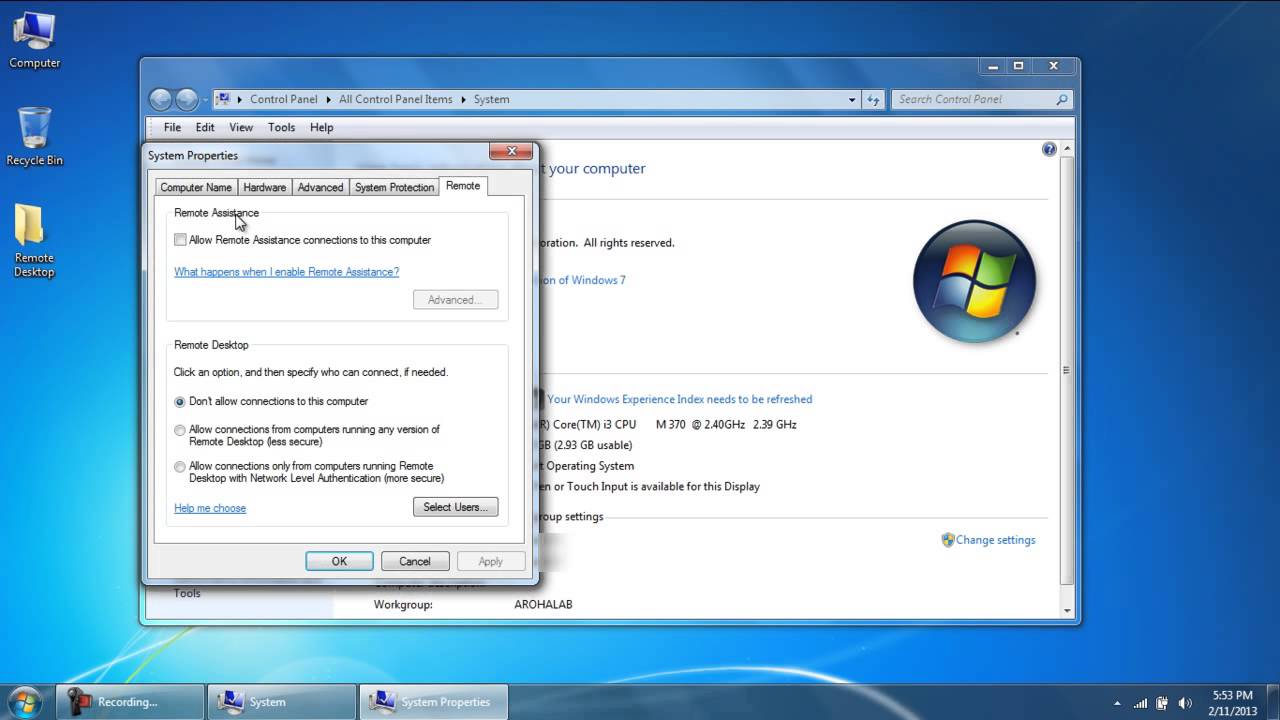
Begin by clicking the Start button, then navigate to the Control Panel. Select System and Security and click on Allow remote access under the System category. In the Remote tab of the System Properties window, check the box for “Allow Remote Assistance connections to this computer” and select the radio button for “Allow connections from computers running any version of Remote Desktop.”
2. Download and Install Microsoft Remote Desktop
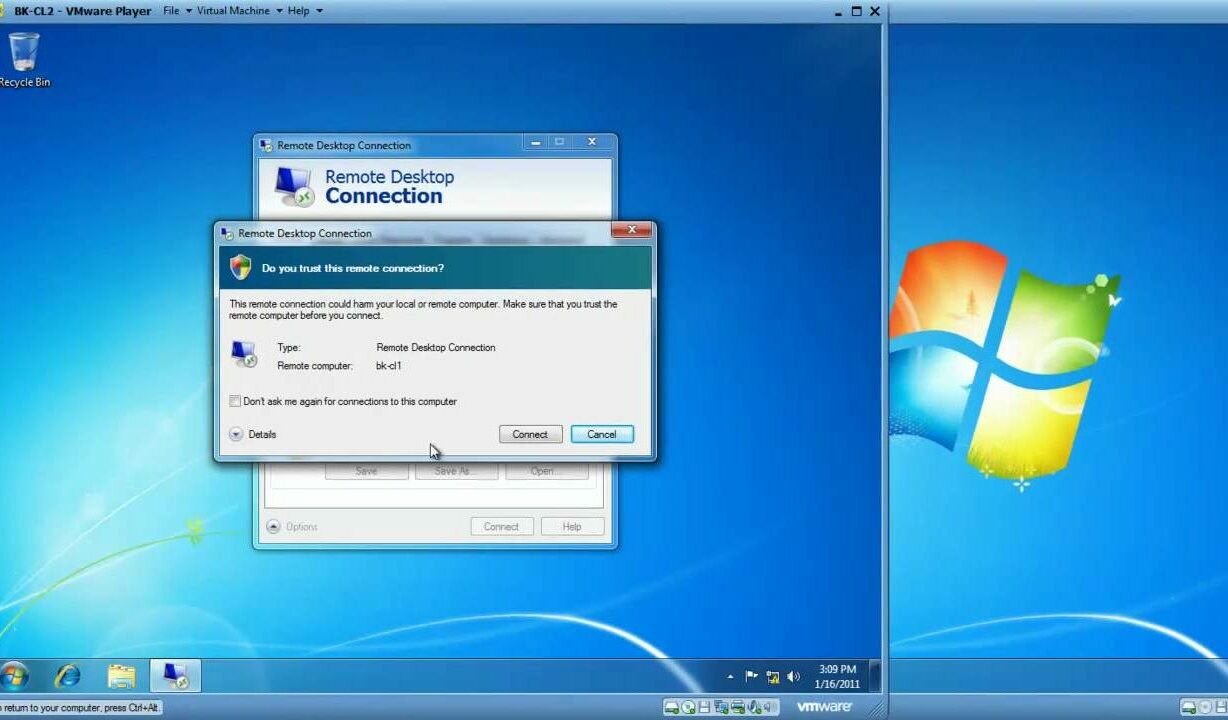
Next, you will need to download the Microsoft Remote Desktop client onto the device you would like to use for remote access. Install and launch the Remote Desktop client, then enter the computer name or IP address of the Windows 7 machine you wish to connect to.
3. Final Settings
Double-check your network settings, firewalls, and antivirus programs to make sure they won’t interfere with your Remote Desktop Connection, and ensure that you are using a strong, unique password to protect your computer and remotely access Windows 7.
Configuring Your PC to Remotely Access Windows 7
To begin, you’ll need to configure your PC for remote access. This process involves enabling remote desktop, allowing connections, and ensuring your PC is secure, and firewall settings are properly configured. Follow the steps below to remotely access Windows 7 computer.
- Click on the Start button and navigate to the Control Panel.
- In the Control Panel, click on the System and Security link, and then select System.
- On the left side of the System window, click on the link called Remote settings.
- The System Properties window should appear. Under the Remote Desktop section, choose the option that says Allow connections only from computers running Remote Desktop with Network Level Authentication. This setting ensures a secure connection with proper authentication. Click Apply to save your changes.
- Now, it’s crucial to check your firewall settings. Go back to the System and Security section in the Control Panel, and click on Windows Firewall.
- In the Firewall window, select Allow a program or feature through Windows Firewall. Make sure “Remote Desktop” is checked, allowing it to pass through your firewall.
Accessing Windows 7 from Android and iOS
If you want to remotely access Windows 7 computer from your Android or iOS device, there are several methods to do so. One popular option is to use the Remote Desktop app by Microsoft, which is available for free on the Google Play Store, Apple App Store, and Microsoft Store.
To get started, follow these steps:
- Enable Remote Desktop on your Windows 7 PC: Click on the Start button, right-click on “Computer,” then select “Properties.” Next, click on “Remote Settings” in the left pane, choose the “Allow connections from computers running any version of Remote Desktop” option, and then click “OK.”
- Note your computer’s name or IP address: You’ll need this information later when connecting from your mobile device. You can find it in the “Computer Name” tab of the “System Properties” window you opened in the previous step.
- Install the Remote Desktop app on your Android or iOS device: Download and install the app from your device’s app store.
- Connect to your Windows 7 computer from the app: Open the Remote Desktop app, and enter your computer’s name or IP address. Tap on the “Connect” button and then enter the necessary credentials, such as your Windows 7 username and password.
Frequently Asked Questions
Q1. How do I enable Remote Desktop on Windows 7?
To enable Remote Desktop on your Windows 7 system, follow these steps:
- Click on the “Start” button and select “Control Panel.”
- In the Control Panel window, click on “System and Security.”
- Select “System” and then click on “Advanced system settings.”
- In the “System Properties” window, click on the “Remote” tab.
- Under “Remote Desktop,” choose the option “Allow connections from computers running any version of Remote Desktop.”
- Click “OK” to apply the changes.
Q2. Is there any free alternative to Windows Remote Desktop?
Yes, there are several free alternatives to Windows Remote Desktop. Some popular options include:
- Chrome Remote Desktop: A browser-based solution that allows you to access your computer from another device using the Chrome browser.
- TeamViewer: A widely-used remote support tool that provides remote access and desktop sharing features.
- AnyDesk: A lightweight and easy-to-use application, offering high-quality remote desktop performance.
Moreover, if you are confused between Anydesk and TeamViewer, you can go through our guide.
Q3. Why is my Remote Desktop Connection not working on Windows 7?
If your Remote Desktop Connection is not working on Windows 7, there could be several reasons. Here are some common troubleshooting steps:
- Check the internet connection to ensure both computers have a stable connection.
- Verify that the Remote Desktop feature is enabled on the computer you want to access.
- Ensure Windows Firewall settings allow Remote Desktop connections or add an exception for the Remote Desktop app.
- Confirm that you are using the correct IP address, username, and password.
- Check for Windows updates and install available patches.
Q4. How can I use Chrome Remote Desktop on Windows 7?
Chrome Remote Desktop allows you to access your computer from another device using your Google account and the Chrome browser. Here’s how to set it up on Windows 7:
- Download and install the Google Chrome browser if you haven’t already.
- Sign in to Chrome with your Google account.
- Go to the Chrome Remote Desktop website.
- Under “Set up Remote Access,” click on “Download” and follow the instructions to install the Chrome Remote Desktop extension.
- Once installed, click “Turn On” to enable remote access.
- Set a name for your computer and create a secure PIN.
After setting up Chrome Remote Desktop on your Windows 7 computer, you can access it from another device by visiting the Chrome Remote Desktop website or using the Chrome Remote Desktop app installed on the remote device. Enter your PIN to establish the connection.

