In Microsoft Teams, the ability to request control during a meeting is an essential feature that allows for better collaboration and interaction among participants. This powerful tool enables you to work together on shared content, making real-time modifications and streamlining the decision-making process.
When attending a Teams meeting, you might need to request control of a screen shared by another participant. Once your request is approved, you will have the ability to make selections, edits, and other modifications to the shared screen, taking your collaboration to the next level.
However, the process to give and request control teams can be a bit confusing for some people. This is why we are here to help you. In this article, we will tell you how to request control Teams and give control. So without any further delay, let’s just jump on to the main topic.
Request Control Teams: Things You Need to Know
Microsoft Teams, at its core, is a collaboration platform that integrates with Microsoft 365 and provides a workspace for chat, meetings, calls, and file sharing. The term “control” within the context of Microsoft Teams often refers to the ability of one user to control another user’s screen during a screen-sharing session in a meeting. Here is the list of actions for which you need to request control Teams, along with other relative information:
- Screen and Desktop Control
Microsoft Teams lets you share your screen or desktop with other participants during a meeting. As a participant, you can request control of the presenter’s screen, allowing you to make selections, edits, and other modifications to the shared content. Once done, you can release control, allowing the presenter to regain control over their shared screen.
- Participant Roles and Permissions
In a Microsoft Teams meeting, there are different roles, like presenter and attendee, with varying permissions. Presenters can share content, request control, and manage participant permissions. Attendees, by default, can only view shared content and request control if allowed by the presenter.
- Managing Meeting Policies
You can use meeting policies in Microsoft Teams to control who can present, request control, and more. These policies allow you to manage settings, such as screen sharing and requesting control, providing a secure and efficient collaboration environment. You can configure these policies according to your organization’s needs to enhance your Teams meetings.
- Content and Screen Sharing
During a Teams meeting, you can share content in various ways, like sharing your entire screen, sharing a specific window, or sharing a PowerPoint presentation. To request control while another person is sharing, select the “Request control” option, and the presenter can approve or deny your request.
- External and Anonymous Users
External users are people outside your organization or anonymous users who join a Teams meeting via a direct link. Meeting policies can be configured to allow or restrict these users from requesting control during a meeting.
How to Request Control Teams?
If you have started the Teams meeting, then you can share your screen easily without the permission of other participants. However, if you are just a participant, you will need to request control teams to the admin of the meeting. Here is how you can do it.
- Join the Teams Meeting: The first step is to join the Microsoft Teams meeting where you want to request control. You can do this by clicking on the link provided to you in the meeting invitation.
- Navigate to the “Sharing Toolbar”: Once you’ve joined the meeting, move your mouse to the top of the screen to make the sharing toolbar appear.
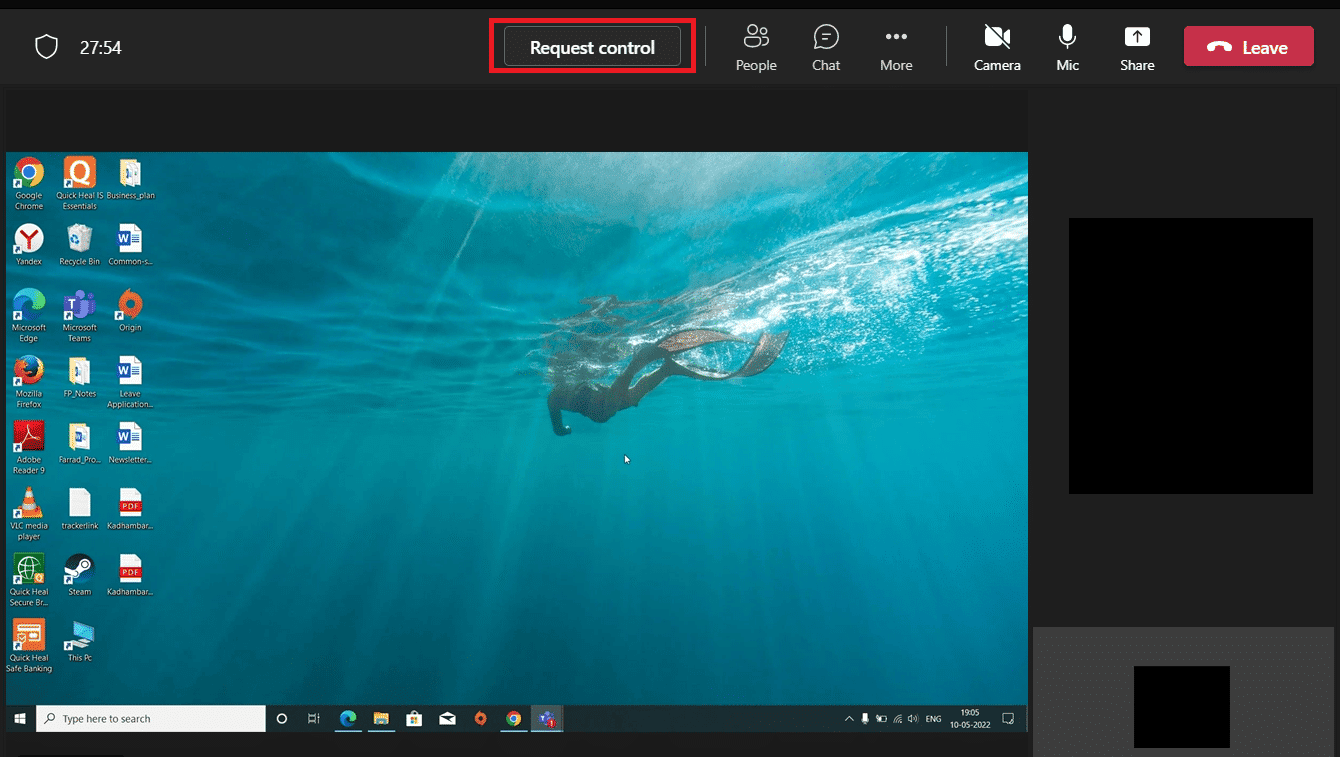
- View Another Participant’s Screen: In order to request control, another participant needs to be sharing their screen. If they are, you will see a “Request Control” button appear in the sharing toolbar.
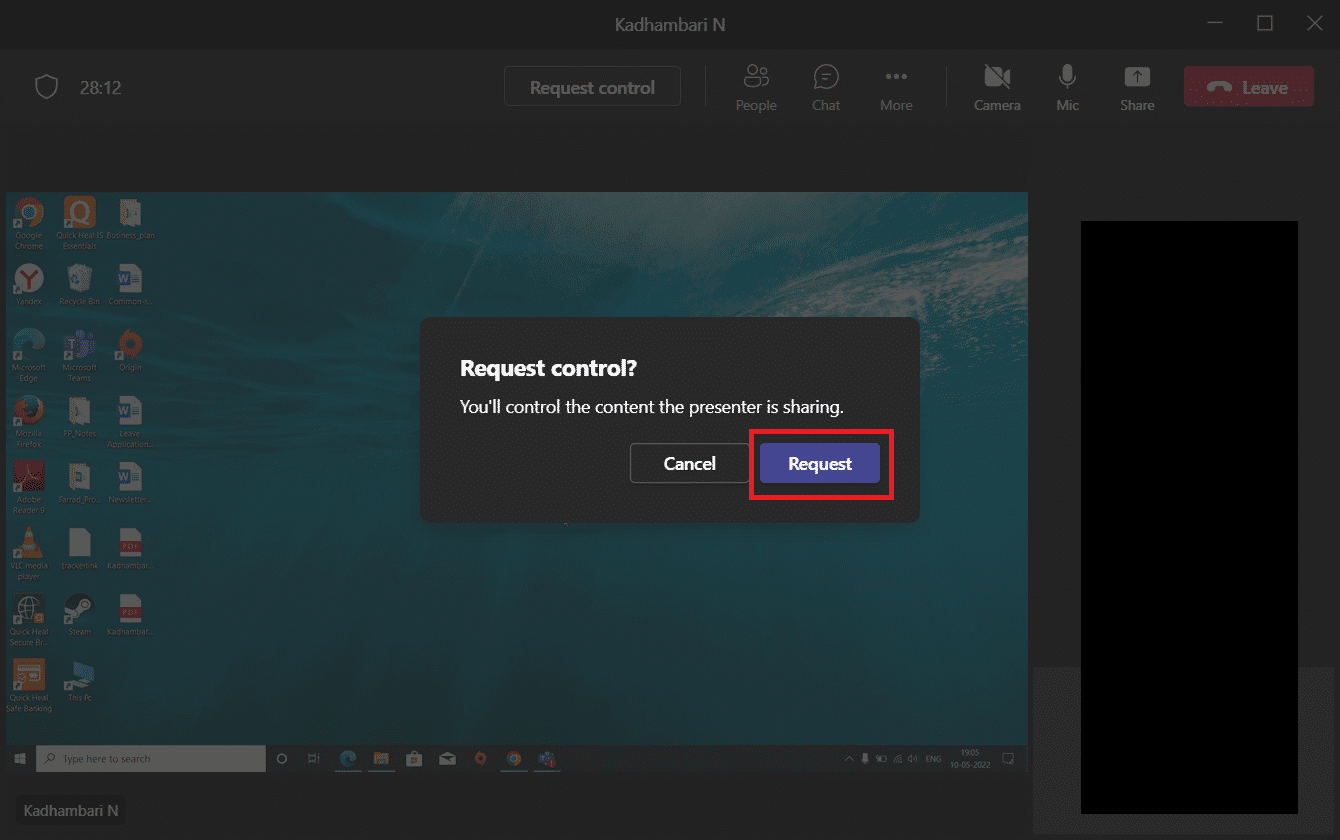
- Request Control: Click on the “Request Control” button. A request will then be sent to the person sharing their screen.
- Wait for Approval: The person sharing their screen has the option to either approve or deny your request. If they approve your request, you will then have control over their screen.
- Start Controlling: Once your request is approved, you can control the presenter’s screen with your own mouse and keyboard.
- Relinquish Control: When you’re finished, you can stop controlling the presenter’s screen by clicking on the “Stop Controlling” button on the sharing toolbar.
However, if you are a Mac user and Microsoft Teams is not working on Mac, then you can check out our article.
How to Give Control on Microsoft Teams?
Now that you know how to request control Teams, now let’s learn how to give control in Teams meetings. You can allow other participants to share their screens during meetings when you are the admin of the meeting. here are the steps to give control to another participant during a Microsoft Teams meeting:
- Start a Meeting or Join a Meeting: First, you need to either start a Microsoft Teams meeting or join an existing one.
- Share Your Screen: Click on the ‘Share Content’ button in your meeting controls. This is typically represented by an icon that looks like a rectangle with an upward arrow. A new toolbar will pop up, showing different sharing options.
- Choose What to Share: Choose what you would like to share, for example, your entire desktop, a specific window, a PowerPoint presentation, or a Whiteboard. After choosing what you want to share, it will be visible to all participants.
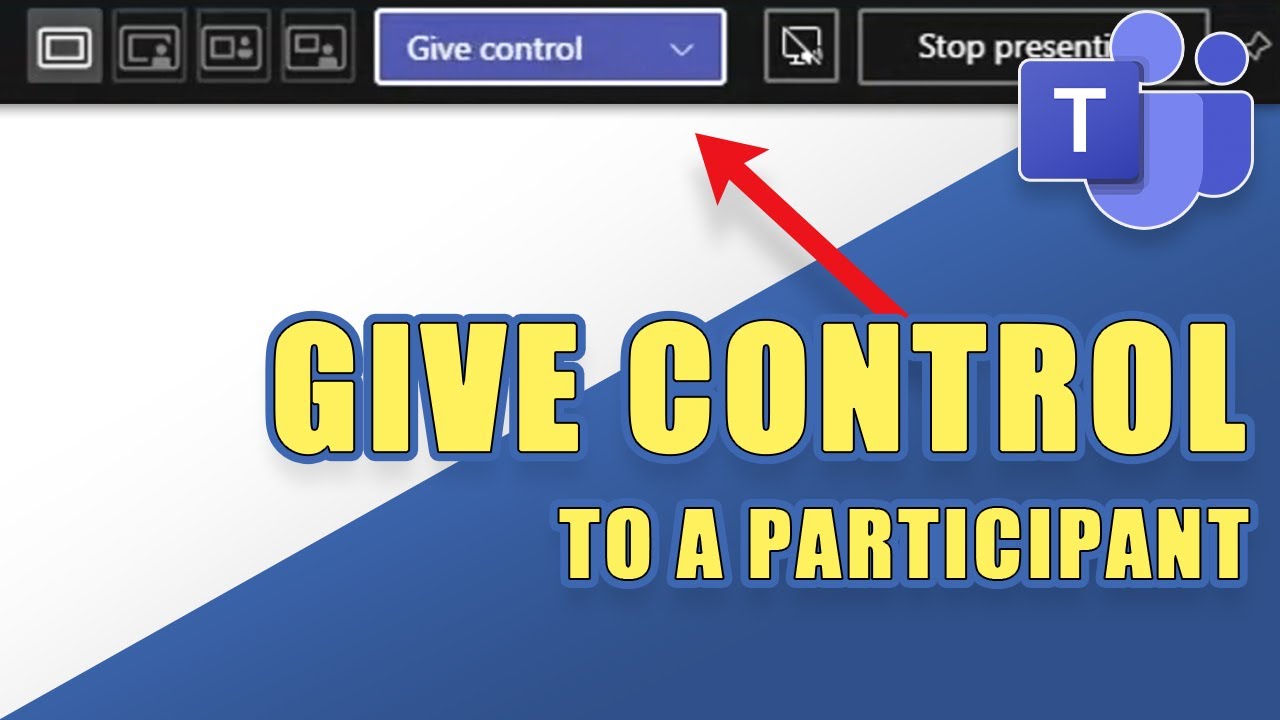
- Give Control: Once your screen is shared, a new control bar will appear at the top of the screen. Click on the ‘Give Control’ button on this bar.
- Select a Participant: A list of all meeting participants will appear. Choose the participant to whom you want to give control.
- Participant Accepts Control: The selected participant will receive a prompt asking them if they want to take control of their screen. They must accept the control.
- Reclaim Control: You can take back control at any time by clicking anywhere on your screen and then selecting ‘Take Back Control’ in the control bar.
For more information on the same topic, you can also read our article on how to screen share on Teams.
Benefits of Microsoft Teams Control
Microsoft Teams’ control feature, which allows one user to take control of another user’s screen during a screen-sharing session, offers several benefits. Here are all the possible benefits of Microsoft Teams Control.
1. Enhanced Collaboration:
- Participants can collaboratively edit documents, spreadsheets, and presentations in real time.
- Facilitates brainstorming sessions with live input from multiple team members.
2. Effective Troubleshooting:
- IT support teams can remotely access a user’s screen to diagnose and solve technical issues.
- Reduces the time and complexity of guiding users through troubleshooting steps verbally.
3. Interactive Training:
- Trainers can demonstrate software or processes directly on a trainee’s system.
- Trainees can practice under the guidance of a trainer, ensuring immediate feedback.
4. Simplified Demonstrations:
- Presenters can easily show software features, processes, or data without needing to verbally guide attendees on where to look or click.
5. Enhanced Sales and Customer Support:
- Sales teams can provide hands-on product demos to prospects.
- Customer support agents can directly show customers how to use certain features or solve common problems.
6. Increased Efficiency:
- Real-time collaboration can speed up decision-making processes.
- Immediate hands-on assistance can reduce the time spent on understanding issues or learning new tools.
7. Flexibility:
- It’s especially useful for remote and distributed teams, bridging the gap created by distance and ensuring that all team members can actively participate.
8. Boosted Confidence:
- Less tech-savvy users can feel reassured knowing that they can receive direct assistance when navigating new or complex software.
9. Cost Savings:
- Reduces the need for in-person visits for technical support or training, leading to savings in time and travel costs.
10. Centralized Control:
- Instead of having multiple people try to direct a user verbally, one person can take control and efficiently execute the needed actions.
11. Security:
- Only the person sharing their screen can grant and revoke control, ensuring that access isn’t given unintentionally.
- This controlled environment is safer than many third-party remote control tools that might be used without proper security considerations.
Frequently Asked Questions
Q1. How do I access remote control in Microsoft Teams?
To access remote control in Microsoft Teams, follow these steps:
- Launch the Microsoft Teams application and sign in.
- Join a meeting where a participant is sharing their screen.
- Hover over the top of the screen, and the sharing toolbar will appear.
- Look for the Give Control option in the toolbar and select the participant you want to give control to.
Remember, administrators might disable this feature in some cases.
Q2. How can I request control in Zoom?
Requesting control in Zoom is quite simple:
- Join a meeting and ensure that someone is sharing their screen.
- Click the “View Options” dropdown menu located at the top of the screen.
- Select “Request Remote Control” and click “Request” to confirm.
- The person sharing their screen will receive a notification to grant you control.
Q3. What causes the Teams sharing toolbar to go missing?
A few factors can cause the Teams sharing toolbar to go missing:
- Your cursor is not hovering over the top of the shared screen.
- The window or application being shared is not in focus.
- The Teams admin has disabled the sharing feature in the meeting policies.
Always ensure your software is up-to-date and contact your administrator if you continuously encounter this issue.
Q4. Why is requesting control disabled by some administrators?
Requesting control can be disabled by administrators for various reasons, such as:
- Security concerns, as it might expose sensitive data to unauthorized individuals.
- Technical limitations or compatibility issues between different devices or systems.
- Preventing disruptions during meetings to maintain a focused environment.
Always communicate with your Teams administrator if you need access to this feature or require further clarification.
