Who has time for clunky, old-school tech support in the age of TikTok tutorials and Snapchat stories? Hence, we are coming up with a simplified Guide for Seamless Support. In this guide, we’re breaking down distance barriers with the most revolutionary tool of the generation called “Windows Remote Assistance.”
So grab your device and get ready to slide into the future of tech support. With this feature, one can easily connect with another computer from afar, assisting and diagnosing the issue remotely. Undoubtedly, it’s a convenient and secure way to receive remote help when you need it most and an invaluable tool for troubleshooting issues in Windows 10.
What is Remote Assistance?

Windows 10 offers Remote Assistance, which enables you to get help or help other users by taking control of another computer remotely. Microsoft also provides a similar tool called Quick Assist.
Utilizing these tools effectively helps resolve technical issues and collaborate, regardless of location. Remember to use trusted connections and follow Microsoft’s guidelines for a secure remote assistance experience.
Setting Up Windows Remote Assistance
Before taking advantage of this feature, ensure that the “allow remote assistance connection to this computer” box is checked in your control panel system under advanced system settings. Here’s how:
- Go to your control panel.
- Navigate to advanced system settings.
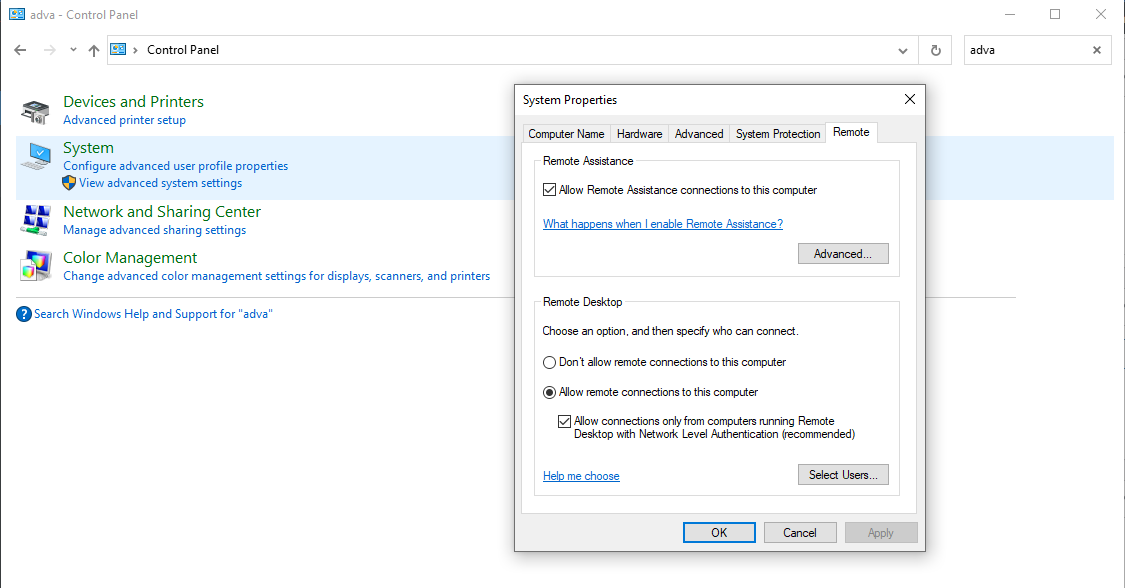
- check the “allow remote assistance connection to this computer” option in the remote tab.
If unchecked, others will be unable to assist you remotely.
Once you’ve enabled access, you can invite someone to connect to your PC and help you with any issues you might be facing. Ensure you and the person assisting are signed in to your Microsoft accounts. This provides a more secure and seamless experience for both parties.
Establishing a Remote Connection
To establish a remote connection using Windows, follow these steps:
1. Initiating a Connection
- Click the start menu and type “remote.”
- Look for “remote assistance” (not “remote desktop connection”).
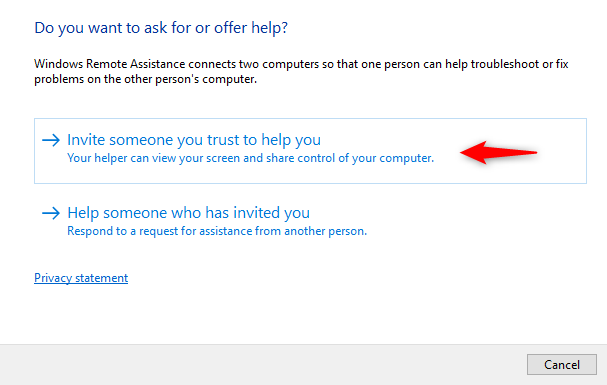
- Click on “Invite someone to connect to your PC and help you or offer to help.“.
2. Inviting Someone You Trust
Ensure that you trust the person before allowing them to take control of your computer, as this prevents potential malware installation. Here’s how to invite someone:
- Click on “invite someone you trust.“
- Save the invitation file as an attachment and send it through webmail or Outlook, if available on your device.
- The invitation script will be sent to the user, who can then assist you.
3. Connecting With the Helper
- Provide the helper with the connection password via email or directly.
- Open the invitation file on the helper’s device.
- Copy and paste the password to connect.
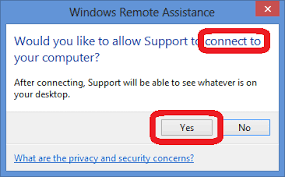
- Confirm that you want to allow the helper to take control.
4. Requesting Control
The helper may need to request control to interact with your computer. Once the request is granted, they can perform various actions, such as opening files or controlling applications. You can check our guide for remote desktop control in Windows 10.
Using Quick Assist
Quick Assist is a helpful tool in Windows 10 that allows you to remotely access another person’s computer to assist with technical issues. In this section, you will learn how to use Quick Assist to provide support effectively.
To start using Quick Assist, press the Windows key + Ctrl + Q or follow these steps:
- Select Start and type Quick Assist in the search bar.
- Click on Quick Assist from the list of results.
Now, you will see two options: Get assistance and Give assistance. To provide help, click on Give assistance. You will be prompted to sign in with your Microsoft account. After signing in, you will receive a 6-digit code. Share this code with the person who needs assistance.

Ask the person requiring help to follow these steps:
- Open Quick Assist on their computer.
- Click on Get assistance.
- Enter the 6-digit code you provided earlier.
- Press Submit.
Once they complete these steps, you should see a request to allow the connection on their screen. Ask them to click on Allow. After a few moments, you will gain remote access to their computer.
How to Turn off Remote Access on Windows?
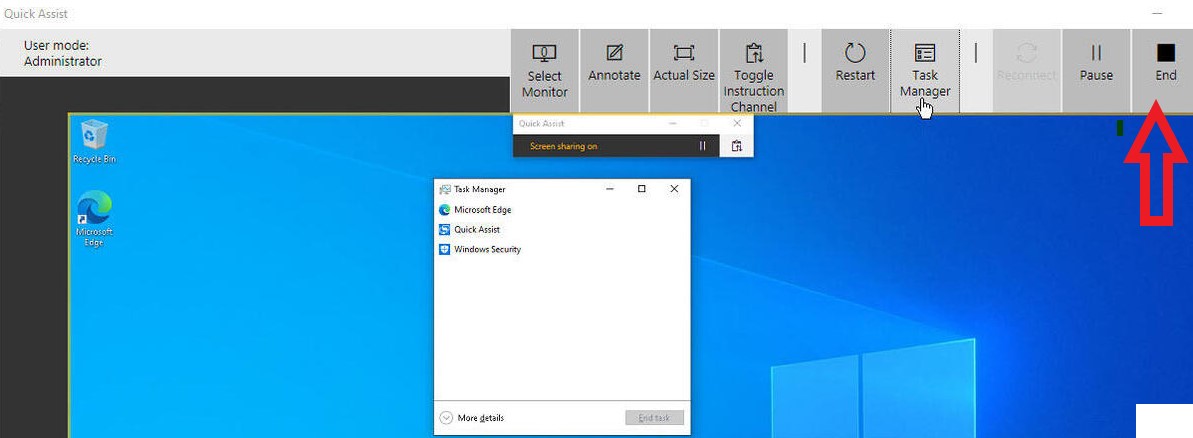
You can disconnect from the remote session by clicking the Stop button at the top of the Quick Assist window. The person you’re helping can also click on Disconnect to end the session from their end. However, Both parties can decide to stop sharing or disconnect the connection at any point. To reconnect, you must start the file again and enter the password to gain access.
Troubleshooting Windows Remote Assistance
Sometimes, you might encounter issues while using Windows 10 Remote Assistance. Don’t worry; you can follow several troubleshooting steps to resolve common problems. By following these troubleshooting steps, you should be able to resolve most issues related to Windows 10 Remote Assistance and Remote Desktop. Remember to be patient and systematically work through the possible solutions to find the cause of the problem.
- Ensure that both your system and the one you’re trying to connect have an up-to-date version of Windows 10.
- Double-check that Remote Assistance is enabled on both computers.
- It’s essential to have the correct version installed. Professional, If you’re using the Home edition, you must upgrade to one of the supported versions to use this feature.
- Ensure that both computers have a stable connection.
- Ensure no firewalls or other security measures are blocking the Remote Assistance.
- Restart both your computer and the one you’re trying to connect to. Sometimes, a simple restart can resolve connectivity issues.
Ensuring Security and Privacy
When using Windows remote assistance, it’s crucial to ensure security and privacy. The first step is to use a security code, which must be entered when connecting to another device. You can check our guide to know which remote desktop is safe. Moreover, always secure your device with a strong and unique password. This way, unauthorized users won’t get access to your system during a remote assistance session.
Lastly, review your remote assistance settings and make any necessary adjustments to maximize the safety and security of your connection. Following these simple steps, you can confidently use Windows 10 remote assistance while securing your data.
Windows Remote Assistance vs. Remote Desktop
In Windows 10, users have two main options for remote connectivity: Windows Remote Desktop and Windows Remote Assistance. The latter is designed to provide an avenue for trusted individuals to assist with computer problems. Whether you need to send an invitation via email or file, Windows 10 remote assistance has got you covered.
Frequently Asked Questions
Q1. How do I enable or disable Remote Assistance?
To enable or disable Remote Assistance on your Windows 10 PC, follow these steps:
- Open the Settings app by clicking on the Start button and selecting the gear icon.
- Click on System and then choose Remote Desktop from the left menu.
- Toggle the Enable Remote Desktop switch to the desired state (On or Off).
- Confirm the changes when prompted.
Q2. Can Windows 10 Home Edition use Remote Assistance?
Yes, Windows 10 Home Edition can use Remote Assistance. However, the built-in Remote Desktop feature is unavailable in the Home edition. This feature excludes Windows 10 Pro, Enterprise, and other higher editions.
Q3. Is a Microsoft account necessary for using Remote Assistance?
No, a Microsoft account is unnecessary for using Remote Assistance on Windows 10. You can use any email address or an Easy Connect code to invite someone to connect to your PC and help you or offer to help someone else. However, having a Microsoft account can simplify the process and enable features like contact lists.
Conclusion
Windows 10 remote assistance is a versatile tool that can be incredibly helpful for solving computer issues. By following this guide, you can make the most out of this feature. Remember always to be cautious when allowing someone to access your computer remotely. Only share your screen or grant access to trusted individuals.
