Zoom in control is an essential feature for any computer user as it allows you to easily magnify content on your screen for better readability and detailed viewing. This can be particularly helpful with images, large documents, or website content.
By understanding various zoom controls, you can customize your viewing experience to suit your specific needs. In this article, we will discuss different ways to zoom in and out on your computer, making it easier for you to access and work with the content you need. So let’s dive in and learn how to make your computer usage more efficient and enjoyable.
Understanding Zoom in Control
Zoom is a popular video conferencing platform that offers a variety of settings and meeting controls to enhance your virtual meeting experience. By learning about these Zoom in control, you can confidently manage your meetings and ensure they run smoothly. In this section, we’ll discuss the key features and functionalities of Zoom meeting controls, including how to access them and ways to use them effectively.
To start, it’s essential to familiarize yourself with the Zoom interface and understand where each control is located. These controls include audio, video, participant management, and screen sharing. Furthermore, you can customize your Zoom settings to suit your preferences and make your virtual meetings more efficient.
Here is a simple guide on how to use Zoom controls:
- Audio Controls: You can easily mute and unmute your microphone during a meeting using the “Mute” button.
- Video Controls: The “Start Video” and “Stop Video” options allow you to turn your camera on or off during a meeting. Also, under the “Video Controls” menu, you can adjust settings like choosing a different camera or applying a virtual background.
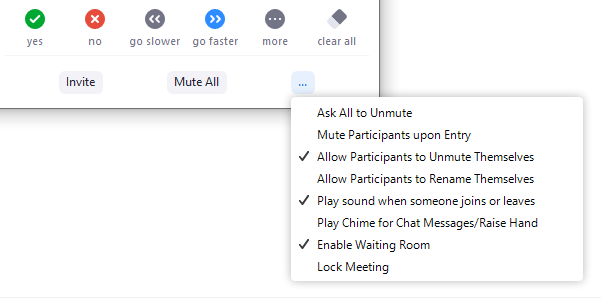
- Participant Management: The “Participants” panel lists all attendees. It also provides options for managing their audio, video, and interaction abilities, such as muting all participants or allowing them to unmute themselves.
- Screen Sharing: This tool also allows you to share your screen or specific application windows using the “Share Screen” button. With this, you can present documents, videos, or slides during a meeting.
- Custom Settings: Access your Zoom settings before or during a meeting to enable or disable features like waiting rooms, breakout rooms, and in-meeting chat.
By understanding these Zoom in control features and applying them effectively, you can make the most of your Zoom meetings and engage with your audience seamlessly and proficiently. Moreover, if you want to learn about screen sharing, then you can go through our article how to screen share on Zoom.
Video and Audio Control in Zoom

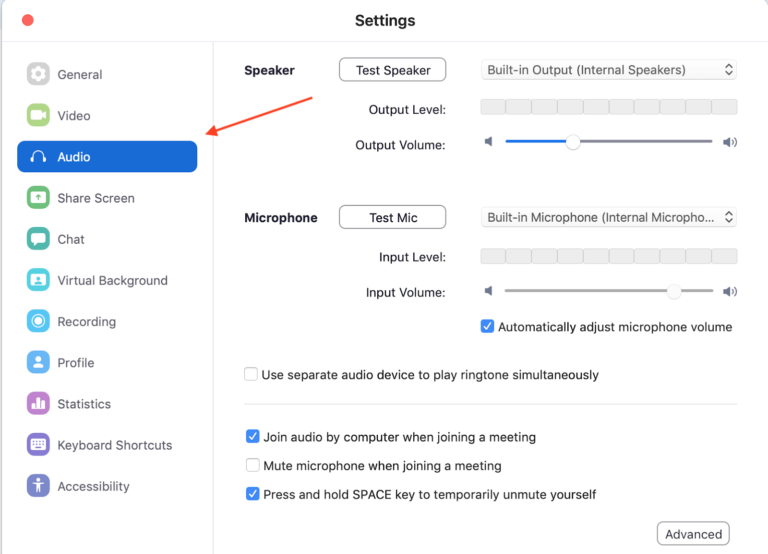
Zoom provides various audio and video controls to enhance communication and collaboration. In this section, we will discuss some essential video and audio Zoom in control features in Zoom to help you make the most of your online sessions. You can access these controls at the bottom of the Zoom window once you join a meeting. Here are some key features that will enhance your experience:
- Mute/Unmute: Easily toggle your microphone on and off by clicking the “Mute” or “Unmute” button. This option helps reduce background noise and allows for better audio clarity during the meeting.
- Start/Stop Video: Manage your video feed by starting or stopping your camera with a single click. This is useful to maintain privacy or save bandwidth during a meeting.
- Volume: Adjust the speaker volume to find the appropriate level for your environment. You can access this option by clicking the up arrow next to the “Mute” button and selecting “Audio Settings.”
- Camera Control: Zoom allows you to switch between different cameras if you have multiple options connected to your device. Access this feature by clicking the up arrow next to the “Start Video” button and choosing the desired camera under the “Select a Camera” option.
These tools enhance your virtual interactions and make your online sessions even more productive. Remember to adjust the volume and camera control settings to optimize your experience.
Managing Participants in Zoom
An essential skill for hosts and co-hosts is managing participants effectively during a Zoom meeting. By mastering the participant controls, you can facilitate a smooth and productive session without disruptions.
Now let’s discuss key features and best practices when managing participants in a Zoom meeting, including host and co-host controls, participant management, and how to remove a participant if necessary. To manage participants in Zoom in Control, follow these steps:
- Assign a host and co-host: As a host, you have control over various aspects of the meeting, such as managing participants. It’s helpful to assign a co-host when you need assistance with administrative tasks during the meeting.
- Access participant controls: At the bottom of the meeting window, click the “Participants” button to open the participants’ list. Here, you will see an overview of all attendees and their roles (host, co-host, or participant).
- Mute or unmute participants: As a host or co-host, you can mute or unmute participants individually or all at once. This helps minimize background noise and distractions.
- Spotlight participants: To spotlight a participant, hover over their name, click “More,” and select “Spotlight Video.” This brings their video to the forefront for all attendees, ensuring that key speakers are visible.
- Rename participants: To rename a participant, hover over their name, click “More,” and select “Rename.” This can be useful to ensure consistency and clarity in the participant list.
- Manage chat privileges: Control the chat functionality for participants by selecting the “Chat” button at the bottom of the meeting window. Choose who can chat with whom: everyone publicly, everyone privately, or only with the host.
- Remove participants: If necessary, you can remove a participant from the meeting. Hover over their name, click “More,” and select “Remove.” Use this feature judiciously to maintain a professional and focused meeting environment.
By applying these steps and practices, you’ll confidently manage participants in your Zoom meetings, ensuring a seamless and productive experience for everyone involved. However, if you use Microsoft Teams and want to learn about screen sharing, then you can read our article, how to scare screen on Teams.
Recording and Captions in Zoom
Zoom allows you to record meetings and add captions to ensure accessibility and better understanding. In this section, we will explore the process of recording Zoom meetings and managing captions.
-
Recording Option
To record a Zoom meeting, you can either save the video locally to your device or to the Zoom Cloud. This functionality allows for easy access, management, and sharing of your recordings later. Check out this guide on Getting Started with Recording on Zoom for detailed instructions.
-
Captioning Options
Zoom also provides options for creating virtual closed captions. These can be either automated or manually entered. Automated captions are generated through the platform’s live transcription service, helping your participants follow the conversation more easily. You can manage your automated captions settings here.
Manual captions, on the other hand, are input by a meeting participant or third-party captioning service, providing more control over the accuracy of the subtitles. You can learn about managing manual captions in Zoom here.
-
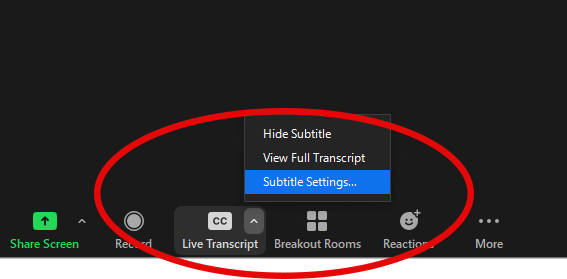
Caption Viewing Options
To view captions during a meeting or webinar, simply click the “Show Captions” icon in the meeting controls toolbar, and feel free to drag them around the window for best personal comfort. More information on viewing captions in a meeting or webinar can be found in the linked guide.
-
Close Caption Options
Finally, if you want to save closed captions from your meeting, Zoom offers a “Save Captions” feature. This allows you and your participants to save the captions history locally on your computer. Read more about saving closed captions in a meeting here.
Troubleshooting Zoom Controls
Zoom is a highly efficient video conferencing platform, but users may occasionally encounter issues with Zoom in Control. Don’t worry; many common problems can be resolved quickly by following simple steps. In this section, we will discuss how to troubleshoot Zoom controls, focusing on resetting controls, seeking support, providing feedback, and engaging with the Zoom community.
Here are a few common Zoom control issues and their possible solutions:
- Restart your computer: Sometimes, problems can be resolved by simply restarting your device. This action can refresh the operating system and fix minor software glitches.
- Sign out and sign back in: If you’re experiencing issues with your Zoom in control, try signing out of your Zoom account in the app and signing back in. This process can help reconnect with Zoom servers and fix any account-related issues.
- Update the Zoom app: Make sure you’re using the latest version of the Zoom app. Updating your software can introduce bug fixes and performance improvements. Zoom Support provides information on how to check and perform updates.
- Use an alternative network: If issues persist, connect to a different network. This step can help identify whether the problems stem from your current network connection.
- Reset Zoom settings: When all else fails, consider resetting your Zoom settings to default. This action may resolve any issues caused by incorrect or conflicting configurations.
Frequently Asked Questions
Q1. How to enable remote control in Zoom?
To enable remote control in Zoom, you need to be the host or presenter of a meeting. While sharing your screen, click on the “Remote Control” button in the meeting toolbar. Then, select the participant you want to grant Zoom in control.
The participant will receive an invitation to accept the remote control. It is crucial to ensure a secure connection when using this feature. Various safe ways to remote control devices can be implemented to avoid security risks.
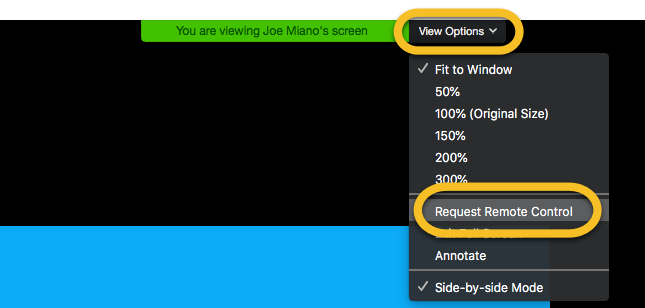
Q2. Can you request remote control in Zoom mobile app?
Yes, you can request remote control in the Zoom mobile app. When another participant shares their screen, tap on the “View Options” button and select “Request Remote Control.” The participant sharing their screen will receive a notification to approve or deny your request. If approved, you’ll be able to control their shared screen remotely.
Q3. How to safely use remote control in Zoom?
To ensure the safe and secure use of the remote control in Zoom, follow these guidelines:
- Grant remote control only to trusted participants.
- Keep your Zoom app up to date.
- Implement strong passwords for your Zoom account and meetings.
- Enable security settings such as waiting rooms or host approvals for joining.
- Limit access to crucial files or applications during screen sharing.
Remember, safety measures like efficiency and secure connections are vital for a smooth remote control experience.
Q4. Is the remote control available in Zoom free version?
Yes, the remote control feature is available in Zoom’s free version. Both free and paid users have access to this function during screen sharing. Remember to use it responsibly and follow best practices for security during remote control sessions.
